It is generally known as a best practice to have automated tests for your web application, which not always is an easy nor cost-affordable task. I have recently used BugBuster, a SaaS testing platform that makes the task easy by providing a solution that does exploratory testing in a smart way.
BugBuster‘s heuristic will crawl around your web application reporting JavaScript errors, missing resources and HTTP error messages; besides, unlike regular crawlers, it will try random combinations whenever it finds an action point: clickable buttons or links, text fields to fill, areas to scroll, and so forth. It is even able to test signup and confirmation emails, and integrates with common CI systems and bug tracking applications.
Some of the most interesting features of BugBuster are:
- Smart exploration: it discovers actions and walks through the application trying combinations that may lead to corner cases that weren’t covered by regular test cases.
- Time-insensitive: BugBuster waits for stable states between actions, so that dealing with AJAX features is as easy as chaining events. Say goodbye to random waits in your test code.
- Signup forms and validation emails: BugBuster can receive automated emails and check whether your signup or other email-based forms succeed or fail.
- Nearly-zero setup effort: it is a SaaS platform, they put the infrastructure at your service; you only have to write the test cases.
- And many others.
In this post I will show how easy it is to test a web application with BugBuster- whether in production, staging or development environments, it can also access your local and private environments thanks to a SSH tunnel. If you want to try it yourself, you can start by creating an account here if you haven’t already, and log in to the BugBuster application at app.bugbuster.com. To illustrate the example, I will test my own blog website.
Step 1: create a project
A project is a container for your test cases or scenarios, that constrains the test exploration to a given set of URLs. Click on the “+” icon next to the project sidebar header, then provide a name and an initial URL. In this case, BugBuster will consider http://jorgealbaladejo.com as the default starting point as well as exploration boundary for any scenario within this project.

Step 2: create a scenario
A scenario is a description of what BugBuster should do and how. Create one by clicking on the “+ Create scenario” button on the top-right corner from the Test plan view, a template selection interface will pop up. A note about templates: they are made of a particular set of predefined parameters that tell BugBuster what to test, and how to do so.
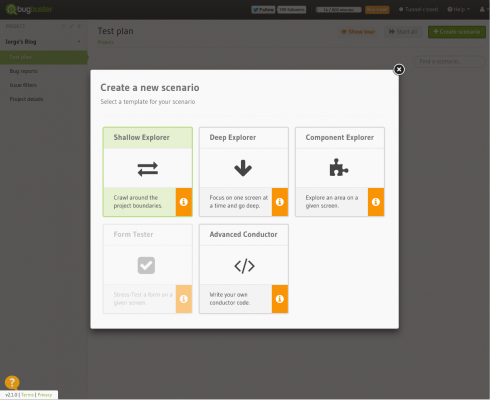
For this example, I am using the Shallow Explorer so that BugBuster will crawl around the website finding missing resources, broken links and generic JavaScript errors.
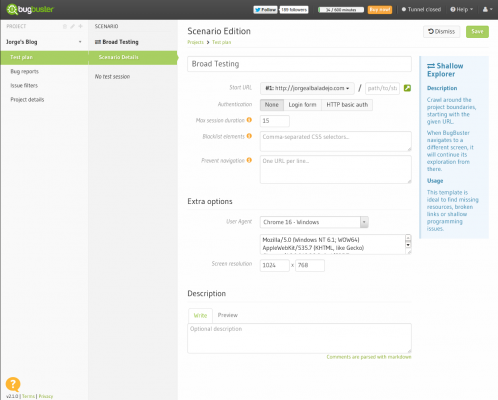
Once in the Scenario Edition screen, I will set the scenario name to “Broad testing” and leave the rest of the options by default. As a reference, the start URL might be something different than the domain root (the project URL chosen before), it may even be within another project URL – projects can have several base URLs. I am not using authentication either, although BugBuster supports HTTP basic auth and regular login forms.
Finally, I will set the maximum session duration to 15 minutes since I am about to test a big website, and for the time being I won’t need to prevent BugBuster from clicking on any element on the page (“Blacklist elements”) nor navigating to some URLs (“Prevent navigation”). Please remind that the exploration will be automatically constraint by the project URL boundary.
Step 3: run the scenario
And that’s all, I can save my scenario and run it to see what happens! The interface will take me to the results page, were I can follow in real-time what BugBuster is doing, and whether it found any issues or bugs.
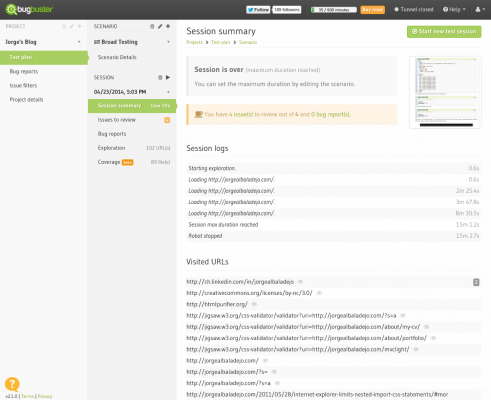
But wait! It already found some issues… clicking on the sidebar menu will take me to the “Issues to review” screen where I can get further information about the problems found by BugBuster.
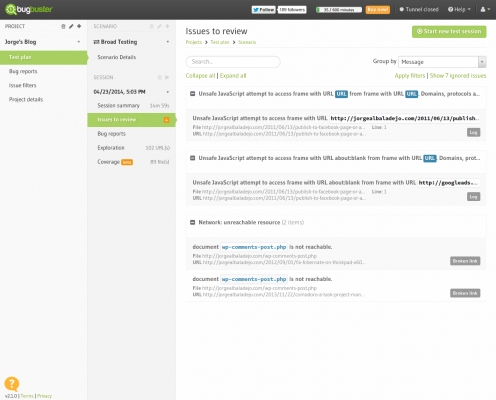
So, there are several issues; the first two seem to be related to third parties like Google Ads, but the last two are directly related to my blog. Let’s see the first two in more detail.
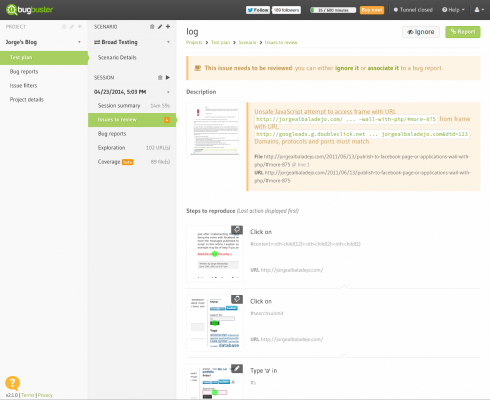
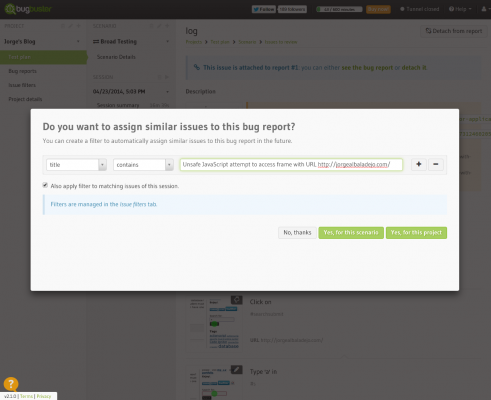
In this case, although I am quite sure that Google Ads would not introduce a bug in my site, I will report the issue as a bug for further follow-up and processing.

And since there were two issues with the same message, probably related to the same bug, I will create a filter that will link any further issue with the same text in any page of my site to the same bug report.
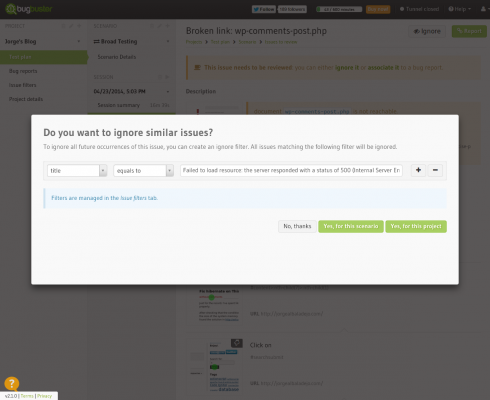
Let’s now review the other two issues about a document “wp-comments-post.php” not reachable. The steps to reproduce this issue are listed in reverse chronological order, to focus on the last actions that triggered the problem – BugBuster sessions can be long, there would be no point on showing the full chain of actions. In this example, after clicking on the “Submit Comment” button without filling the submission form will produce an HTTP 500 server response. This is not actually a bug, but a desired behavior. Normally, I would create an advanced test scenario that would check for a human-readable error message on the interface; for now, I will just ignore both two issues, creating a filter as I did before for the bug report.
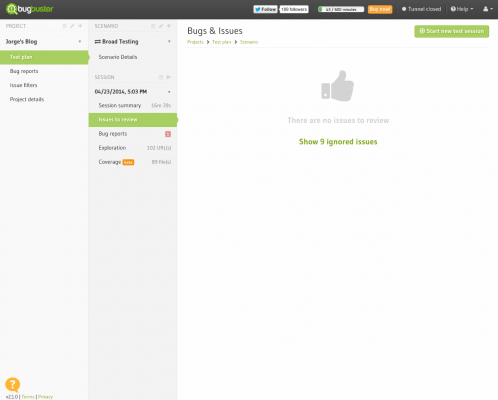
After that, there isn’t any more issue to review, and just one bug report that will be kept in record for future reference. Ignored issues will be hidden but still reachable in case they need to be reviewed.
With BugBuster, it is very easy to create filters to ignore issues that are not relevant – known issues and warnings mostly. Moreover, bugs can quickly be reported and exported to human-readable formats as well as other bug trackers like Jira or Github.
Wanna try yourself?
app.bugbuster.com